My son turned 6 this year. We’ve had a lot of family get togethers for his birthday. But I have not had a big party with his friends yet. So this year I decided to pull out all the stops and create something fun and magical for him.
I had a tough time deciding on a theme. Not that you really need one. But a theme helps me get the creative juices flowing. Sometimes creative boy parties can be tough. I was leaning toward a pirate party… I know it’s been done a million times. But you could do so many fun things with it. I was contemplating on a small ship for displaying goodies. And then it quickly morphed from pirate ship to viking ship (I guess they are still technically pirates). And then it went from a small ship to a giant ship they could eat at. And then I got all giddy and excited for a…
The timing worked out perfectly because How to Train Your Dragon II was coming out close to the same time as the party. We also love the books around here. We have them on audiobook and the kids love to listen to them while they are doing chores. The narration is a hoot. BTW I’m totally listening to the HTTYD soundtrack while I write this. Which makes me soooo dorky.
Alright… let’s take a look at this epic (I only wrote epic because this soundtrack sounds so epic”ish”) party…
I think they turned out pretty darn fun.
The invite reads…
In honor of his 6th Birthday
you are invited to attend…
Milo’s
Viking Academy
Test your viking swordsmanship skills.
Flaunt your brute brawn in the viking games.
Hunt and tame the fiercest dragons known to man.
Join this viking expedition on
Friday June 13th
Board the viking ship at the Snow wharf
The ship sets sail promptly at 2:30
and will return at 5:00
While aboard a viking feast will be served.
So bring your burly appetite.
RSVP
Call or text Anj
111-111-1111
These invites were hand delivered… they are a bit too big for an envelope. But honestly my kids prefer doing that anyway.
This was my favorite part. For one it looked fantastic in our living room. But mostly because I had this idea in my head. “I’m going to build a viking ship out of cardboard and pvc pipe.” And I like the challenge of trying to actually make it work.
I started by sketching out the dragon bow. And then drew it onto the cardboard with sharpie markers before I even knew if it could actually work. There is no way I can really explain how I made this thing. It was such a build as you go… pray as you go project. So then I just started building around the dragons. There was a lot of PVC pipe, hot glue, twine & wire involved. And my husbands barbells were used to weigh it down and keep it from tipping over. :)
Now I can give you a few details about the sail… in case you are feeling adventurous and want to build something similar. The skeleton of it is built out of PVC pipe. I started with a pipe (cut to the size I wanted) and put it in an old bucket. I poured a bag of quick set cement and a gallon of water into the bucket. Stirred and let it set. Now that pipe wasn’t going anywhere (and it weighs a flipping ton). The fabric for the sail I got from IKEA. I used 2 yards. I used a dremel tool to cut long holes into the ends of the pvc pipe. (The pipes that run horizontal). Then I put 4 long strips of wood (we had them hanging out in the garage) into the holes in the pipe. Then I wired the top pvc pipes to the bottom in order to create tension. This forced the wood strips to bow. Then I laid the fabric on top of it and used a staple gun to secure the fabric to the wood. I used a couple of dowels (I again had hanging around the house) in-between the wood strips to keep them from folding inward.
To be honest putting the boat & sail together was my favorite part. One of my daughters is super crazy creative and is constantly making things. So she was my right hand gal. We didn’t have my husband around (he was out of town on business). So it was me, a 9 year old, power tools and our joined creative brains. She would giggle (she has the best giggle) every time something would work. She also helped me with the problem solving that would occur as we were constructing. For instance the wood slats were putting too much pressure on the pvc pipes causing them to bending outward. We sat back and talked about how to fix it. At first we used twine. We tied it from the top pipes to the bottom. But the twine snapped. So we discussed again and then we grabbed the wire… success! And then she jumped around and giggled. I love that kid.
The sail was placed in-between two long tables. I draped both tables with white plastic tablecloths. Then I ran white wrapping paper across the top of the two tables. I drew “wood slats” on them to look like the floorboards of a ship. I wrapped rope around the exposed pvc pipes on the sail.


There is nothing quite like having an idea in your brain and actually having it work. I was giddy for a full week after building it. And having my 9 year old daughter in the process was priceless.
Now… on to the party!!!
As the kids arrived I had the HTTYD shorts (that are currently on Netflix) playing on the TV. They are only 15 minutes long, so it was perfect as we waited for kids to filter in.
Now if I had all the money in the world I would have found out how to get the turkey legs from Disneyland as our main corse. Since that wasn’t going to happen I opted for chicken wings from Buffalo Wild Wings. Now in hindsight I should have gone for the boneless wings. (I wanted something more authentic so I went with bones). Most kids were ok with the bones. However there were a few that looked at me like I was a crazy lady when I told them to eat around the bone. I ended up tearing the meat off of the bone for them. Welp… live and learn. We also had veggies and some gold fish for snacking.
(I'll talk about those fun dragons on the middle of the plates a bit later in the post).
The napkins were labeled as Dragon Hide. I sewed a 12x12 inch square of fabric. Then I cut “teeth” out of white felt and sewed it onto the bottom of the napkin. The bamboo flatware I got here… Bamboo Flatware
Fabric for the napkins is Belle Fish Scales Cotton Fabric by Mary Fisher. Spoonflower had some amazing fish scale fabric. But it was out of my price range.
I served Jones Green apple soda relabeled as Dragon Blood.
After filling their bellies we went on to the activities.
The premise of these games was for each child to prove that they were worthy of becoming an official viking. K… so originally wanted a bounce house (the obstacle course type). But I found they were ridiculously expensive to rent. So I had to pass on that idea. But if you wanted to do this party I think an obstacle corse bounce house would be a fantastic idea.
Viking Game 1
To earn their viking helmet they had to demonstrate their viking strength. We took an entire roll of crepe paper streamers and wrapped it around each child. (We did 4 kids at a time). I would recommend an adult do the wrapping. (My daughters wrapped a couple of the kids and it didn’t have quite the same effect). Make sure you pull it pretty tight, but not tight enough to break. Then on the count of 3 the kids raced to see who could break free the quickest. Some kids got out pretty rapidly. But there were a few that fell over and wriggled like worms to get out. It was hilarious. Little boys in particular can get pretty competitive when it comes to strength competition… so they took it very seriously even when they were on the ground, rolling around to get free. This will work great with young kids (4-7 years old). They felt like heroes breaking out of it… even though it really wasn’t that tough. (I was worried that it might be too easy). But the kids response was so lively and comical that it was a total win.
So after this the kids were awarded their helmets. I snagged these from here VIKING HELMETS
But me being me I couldn’t just leave them as is. I added craft fur to the boys helmets. Either around the horns or around the rim of it. I even added a little rope here and there. For the girls I made 2 yarn braids for each and added some jewels. (Those were a riot).
Viking Game 2
This one was pretty straight forward. The kids now needed to earn their shield. We had a basket they had to toss a shield in. If they didn’t get it they had to go to the back of the line. Once someone got it in they could go pick out their shield. (This helped keep it fair on who got which shield).
So about the shields. I made these. I purchased “16 inch disposable platers from a local restaurant supply store (Orson Gygi) Then I decorated them with felt (I had a bunch of felt left over from the felt dragons... more about them in a minute). I glued handles onto the back. I thought the handles would hold up, but hot glue was not enough. I should have punched holes and tied the handles on. Or perhaps super glue would have worked. I had to do surgery with the glue gun throughout the party. Which was fine. But I should have had my son run around with one for a few hours to test it out before hand.
Viking Game 3
Sword training. We presented them with their foam swords. I explained that they needed to be expert dragon fighters. And this would require some training. So here they were. Decked out in their helmet, sword & shield. And I poured out upon them 2 dozen green balloons. I told them that the balloons were “practice dragons” and to go to town. They fought like it was their last day on earth… to the death! It was quite a sight to watch. It was like they were free at last! They could hit, punch and attack the balloons and no one told them to stop. Sillies.
The price was great but a lot of the handles were breaking off by the end of the party.
Now it’s been a week since the party. But occasionally when I’m out and about in the neighborhood I’ll see a little viking running around. It’s absolutely fabulous.
So now that they were official trained vikings we could go attack a “real” dragon.
Which was a dragon piñata.
After this epic (there is that word again) battle they again had worked up an appetite. So it was time for cake and ice cream.
Seriously… I die. These are so fun. Again this was one of those… I hope this actually works moments. Especially because I didn’t decorate the cakes until the morning of the party. (I need to stop doing that… one of these day’s I’m going to have a major fail). I used this cake pan to make the cakes.
(I did actually make the cake itself the day before). I put the two ball halves together with frosting and then crumb coated them in frosting. Then I stuck them in the freezer. When I was ready to decorate them I pulled them out of the freezer. I stuck a dowel in one end then I spread a coat of light green frosting all over the cake ball. (I used AmeriColor 162 Electric Green coloring for the frosting). Then I rolled and dipped the ball into green sugar crystals (it’s a bit chunkier than sanding sugar). Carefully I took it off of the wooden dowel and set it onto a 6” wood plate. I got the plates here 6" PLATES
Then I added the dragon head, tail, & wings with toothpicks. And for the feet I just put a little dab of frosting on the back and lightly pressed it onto the cake ball.
Then after sugaring the little vikings up we moved on to the…

Now this is my son's dragon. The rest of the dragons had teeth. But my son insisted his should not have teeth. Because it was a night fury... even though it is red.
Now that they were official vikings they were qualified to adopt their own baby dragon. We had a small training session before each child received their new fire breathing pal. I was a little worried that 9 boys and 4 girls (all 5 to 6 years old) would have a hard time sitting through me reading this little booklet. But they were so quiet. It was crazy. I had one of the baby dragons on my lap and we talked about how they needed to listen to a few tips about their new pet.
I came up with an owners manual for each child. As we read through it together there was a bit of laughter. However the last page… (the warning) had a few kids in full blown giggle fits. I’m actually going to post the entire thing here… so you can read it for yourself.
DRAGON OWNER’S GUIDE
Congratulations!
You are now a dragon keeper!
This pamphlet has been assembled by The Viking Chamber of Dragon Control to assist you through the first few weeks of dragon ownership!
Good luck in your adventure!
FEEDING YOUR DRAGON
Some dragon species are carnivores while others are herbivores.
It is easy to determine which type of dragon you have. Simply place a
tray of meat and a bowl of veggies before your dragon. It will quickly devour its meal of choice. However take care when placing food in front of the beast. Do not leave your hand or any other limb close to the food. If it is a carnivorous dragon it may mistake your arm... for a turkey leg.
A DRAGON’S HABITAT
Most dragons prefer caves as their habitat. At night snuggling with your dragon under the blankets will make him feel at home. Just take care that your dragon doesn’t breath fire when it snores…
that never turns out well.
TRAINING YOUR DRAGON
This will take a lot of time and dedication. We recommend executing many pretend battles. Melodramatic princess rescuing. And a lot of outside playtime. Dragons enjoy play sets, swings and even trampolines. Just make sure your mother viking approves. Spending time with the creature
ensures your dragon’s loyalty. It also will become more obedient and mindful of its manners. This will deter it from biting off your fingers. Or setting you on fire.
DRAGONS LOVE TREASURE
They are instinctively drawn to anything gold, gem like or sparkly. Unfortunately they can’t help themselves from stealing and hoarding treasure. If you find your belongings go missing we recommend you
search your dragon’s nest before blaming a sibling or calling viking law enforcement.
WARNING
Dragons should be handled with care. They may have razor sharp teeth,
exhale fire, a tail that acts as a whip and dagger like talons. A dragon that consumes too much sugar will become bloated with an excessive amount of gas. The beast’s trail of putrid flatulence could cripple friend or foe.
For the first few weeks of ownership it would be advantageous to handle your dragon with oven mitts and if necessary use nose plugs.
The Viking Chamber of Dragon Control will not be held liable for any damage caused by your dragon. Including death or dismemberment.
Own at your own risk!
After this they each received their own baby dragon and we filled out an adoption permit card together.
They now were official viking dragon keepers. Such a fun group of sillies.
Photo 1… I told them to smile.
Photo 2… I said act like vikings.
Photo 3… well, they were done holding still.
Here is the goodies set up at the party.
I also gave them a giant jaw breaker. I believe they were the 2 1/4” inch size… I picked them up from a local party store (Zurchers). But you could find them online. The jaw breaker was labeled as a Dragon Egg.
I was a little concerned about how boys would respond to the whole adoption thing. I wasn’t sure they’d take to the dragon stuffed animals like the girls had from both the owls and the bunnies from my other parties. But after the party I started getting loads of feedback from parents. One little boy had to take his dragon out to dinner with him that night. He asked the waitress to bring his dragon its own glass of water. Other boys slept with their dragons. Two brothers made their beds the next day with their dragons set up with their pillows and their viking hat shield and sword laid out nicely at the end of their beds. And a little girl declared it was the best party she had been to. So it seems it was an epic ;) success.
And this little viking had the party of his life!
Oh how I love my Milo!
I do have everything available on my etsy site (the printables). However I’ve still got to put together the pattern for the dragons. Patterns really take quite a bit of time. So my hope is to have that up in the next couple of weeks. Here is the link to my Etsy if you are interested!
 Totally Tokyo Birthday Party


 Often TAKESHITA is written across the front on balloons, so we mimicked that as well with my daughter's name displayed on yellow circles. A wonderful seller HandMek


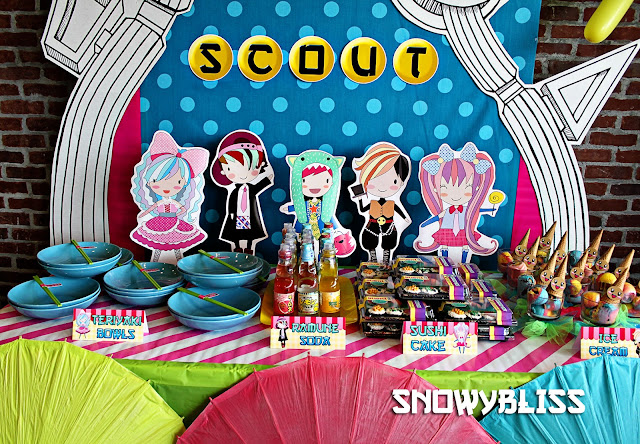
 A little tip… Things like the ramune soda, treats, chopstick etc… are loads cheaper to purchase at a local Asian food market. Additionally these markets are fantastic to walk through! It’s worth checking them out before purchasing anything online. We come home with way too much stuff when we head to one. It’s always fun to try new things! And my kids love it!


